QR Code Menu Setup Guide for Small Restaurants and Cafes
If you run a small restaurant or cafe, you've probably noticed QR code menus everywhere — from the dumpling shop down the road to the wine bar in the next suburb. But if you haven't set one up yourself, the whole process can feel more technical than it actually is.
Here's the truth: you can go from zero to a working QR code menu in an afternoon. No IT department, no web developer, no expensive point-of-sale system. This guide walks you through every step, from organising your menu content to placing QR codes on your tables.
Why QR Menus Make Sense for Small Restaurants
Large restaurant groups adopted QR menus years ago because the cost savings scale nicely across dozens of locations. But the advantages are arguably even more relevant for small restaurants and cafes with tighter budgets and fewer staff.
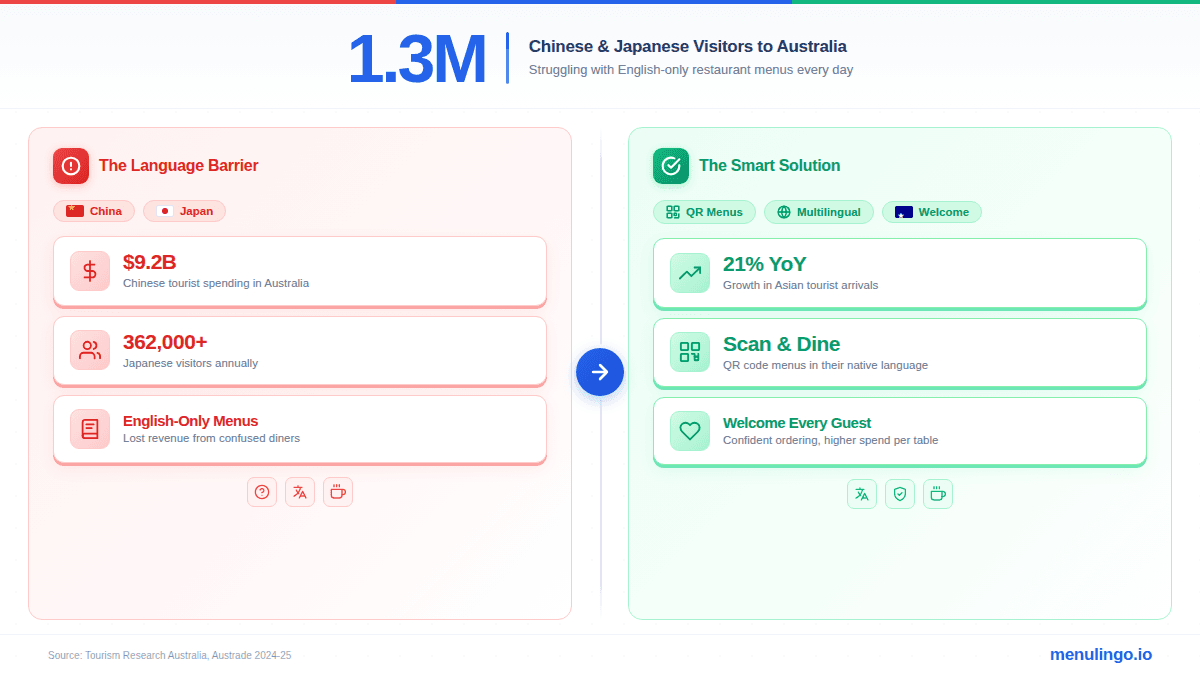
No reprinting costs. When you change a price, swap a dish, or add a seasonal special, you update it once in your digital menu and every QR code in the venue reflects the change immediately. No waiting for the print shop, no stacking old menus in the storeroom. If you've ever dealt with outdated menus costing you revenue, you know how frustrating the reprint cycle gets.
No tech skills required. Modern menu platforms are designed for restaurant owners, not developers. If you can fill in a form and upload a photo, you can build a digital menu. The platform handles the layout, responsiveness, and QR code generation.
Better experience for international diners. If your cafe is anywhere near a tourist area, university precinct, or international airport, a percentage of your customers don't read English as a first language. A digital menu with multilingual support solves that problem without printing separate menus in every language.
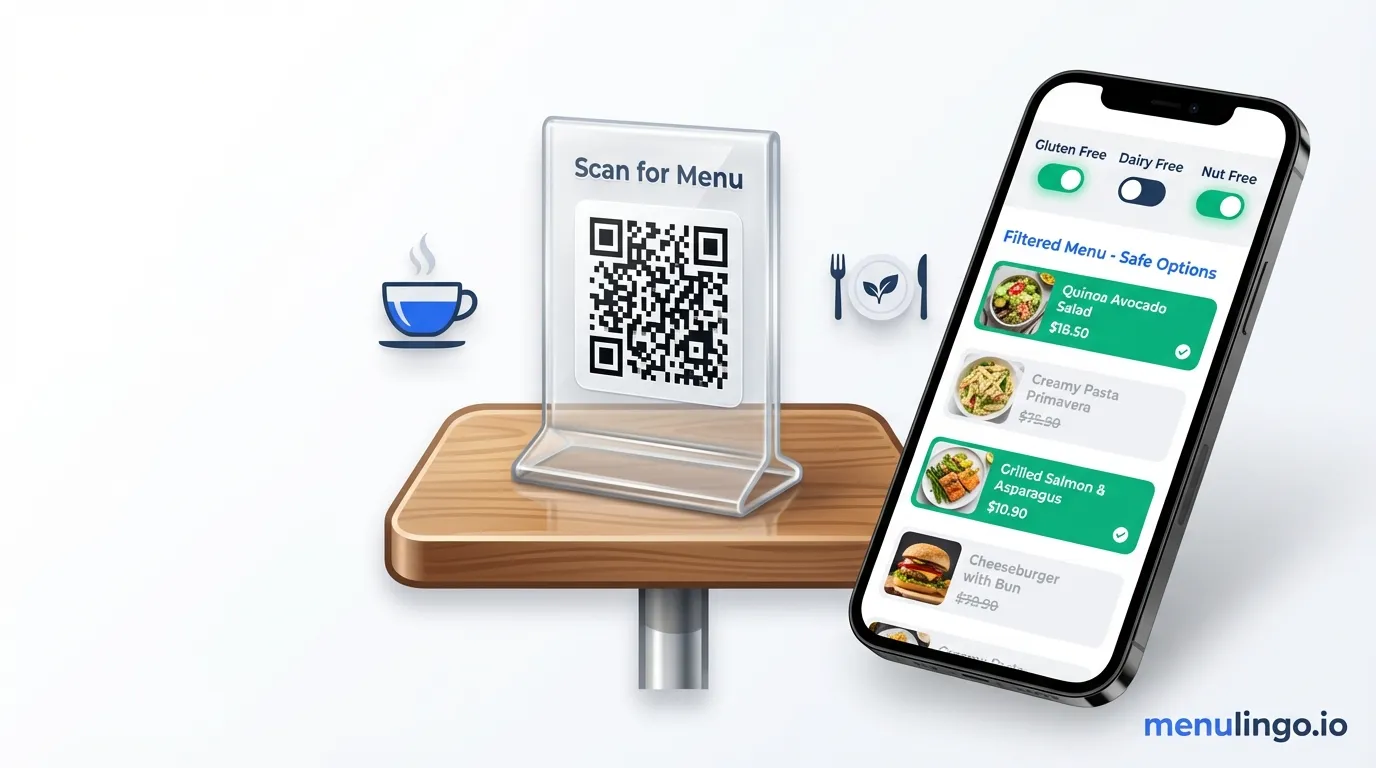
Built-in allergen information. Paper menus with allergen footnotes are hard to maintain and easy to get wrong. A digital menu can include allergen detection that lets diners filter dishes by their specific requirements — no awkward conversations, no risk of miscommunication.
For a deeper look at the broader advantages, read why QR menus work as a competitive strategy beyond just contactless ordering.
What You Need Before You Start
Before you touch any software, get these three things sorted:
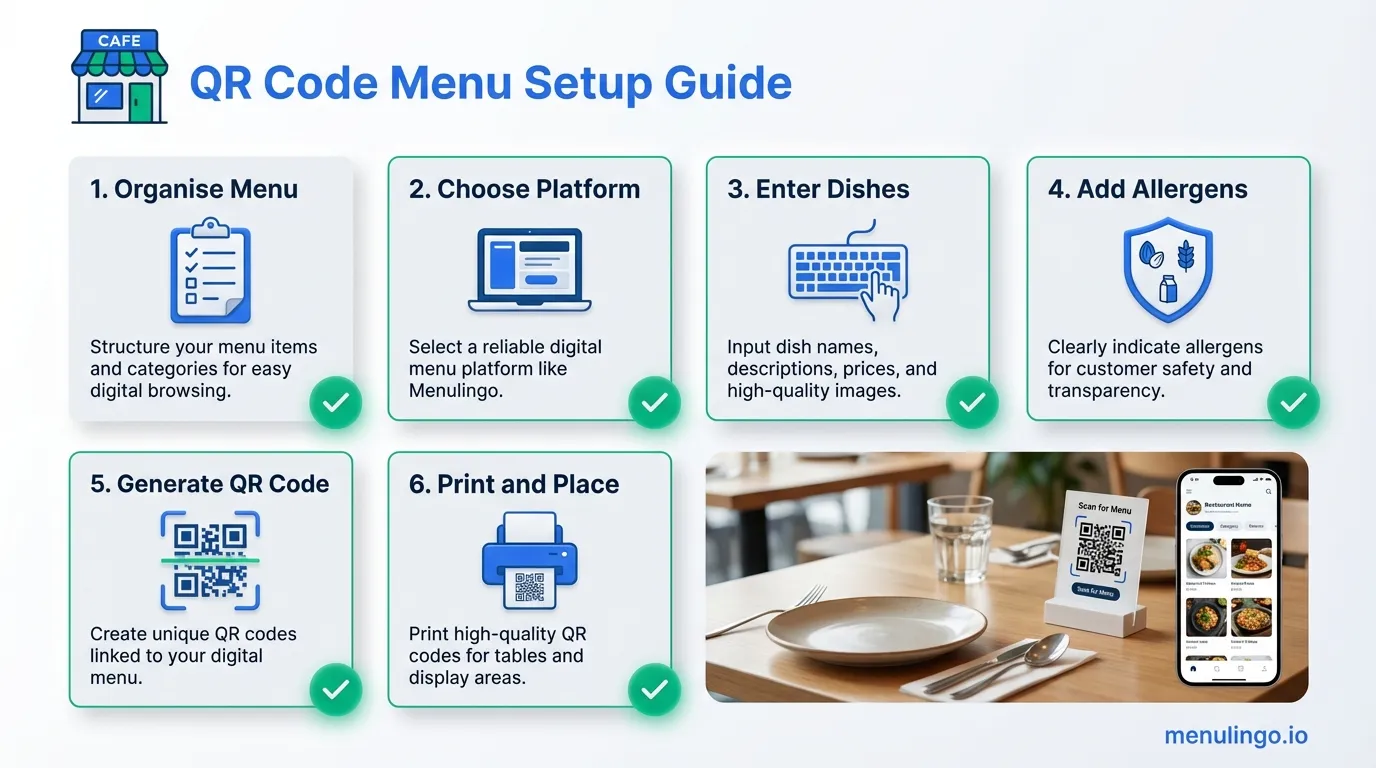
Your menu, organised by categories. Write out every dish grouped by category — starters, mains, desserts, drinks, or however your menu is structured. Include the full dish name, a brief description, and the current price. If you already have a printed menu, you can work from that.
Finalised pricing. Digital menus are easy to update later, but you'll save yourself time if pricing is settled before you start entering items. Decide on any specials or seasonal pricing now.
Allergen information (if possible). You don't need a science degree for this. At minimum, know the common allergens in each dish — gluten, dairy, nuts, shellfish, eggs, soy. If you're unsure, your kitchen team or supplier can usually confirm. Even partial allergen info is better than none, and some platforms offer AI-powered allergen detection that can help identify allergens from ingredient lists.
If you're starting from scratch with a brand-new menu, our guide on how to create a digital menu covers the menu design fundamentals.
Step 1: Choose Your Platform
You don't need a point-of-sale system to run a QR code menu. Many restaurant owners assume they need a full POS integration, but if you just want diners to view your menu on their phone, a standalone QR code menu maker for restaurants is simpler and cheaper.
When comparing platforms, look for:
- No app required for diners. The menu should open in the phone's browser — no download, no registration.
- Mobile-first design. The menu needs to look good on a phone screen, not just on a desktop.
- Easy editing. You should be able to update dishes, prices, and descriptions yourself without calling support.
- QR code generation built in. The platform should generate your QR codes, not require you to use a separate tool.
- Allergen and language support. Even if you don't need these today, choosing a platform that offers them means you won't need to switch later.
For a detailed comparison of what's available, check our review of menu management software options on the market.
Step 2: Enter Your Menu
Once you've chosen a platform, the next step is entering your menu content. Most digital menu builders follow a similar structure: you create categories, then add items within each category.
Keep descriptions concise. Two to three sentences per dish is plenty. Include the key ingredients and any standout elements — "Pan-seared barramundi with roasted fennel, lemon butter, and seasonal greens" tells a diner everything they need.
Don't worry about photos yet. You can add dish photos later. A clean, text-based menu is perfectly effective, and adding photos of every dish can actually slow down the browsing experience on mobile. Start with text, then add photos to your top-selling or most photogenic dishes over time.
Use consistent formatting. If one dish has a description, they all should. If one price includes GST, they all should. Inconsistency makes a menu look unfinished.
Double-check prices. This sounds obvious, but it's the most common mistake when entering a menu for the first time. Cross-reference every price against your current printed menu or POS.
Step 3: Set Up Allergen Information
Even if your jurisdiction doesn't legally require allergen labelling on menus (many do — and more regulations are coming), providing allergen information is simply good hospitality. It also protects your business from liability.
For a small cafe, this doesn't need to be complicated. Go through each dish and mark the allergens that apply. The most common ones to check are gluten, dairy, eggs, tree nuts, peanuts, soy, fish, shellfish, and sesame. If your menu includes dishes from cuisines that commonly use specific allergens — for example, soy and sesame in Asian-inspired dishes — pay extra attention there.
Some platforms use AI to suggest allergens based on your ingredient descriptions, which saves significant time. You should always review and confirm these suggestions manually, but it gives you a solid starting point.
If you want a thorough approach, follow our compliance checklist to make sure you're covering all bases. And if your staff interact with diners about allergens, addressing staff allergen training gaps early will prevent problems down the road.
Step 4: Generate Your QR Codes
With your menu entered and allergen information added, generating a QR code is usually a single click in your platform.
Here's what happens behind the scenes: the QR code encodes a URL — typically a short redirect link like /q/abc123 — that points to your live menu page. This redirect layer is important. It means the QR code itself never changes, even if you restructure your menu or move to a different URL. The redirect simply gets updated to point to the right place.
Why does this matter? Because you're about to print these QR codes on physical materials. If the QR code pointed directly to a specific page URL, changing that URL would mean reprinting every QR code in the venue. With a redirect layer, your printed QR codes are effectively permanent.
Generate one QR code per location or menu. If you have a single venue with one menu, you only need one QR code. If you run a cafe with a separate breakfast and lunch menu, you might generate two — one for each. Some platforms let you generate table-specific QR codes if you want per-table analytics, but for most small restaurants, a single code works fine.
Step 5: Print and Place Your QR Codes
This is where your QR menu becomes real. The best digital menu in the world doesn't help if diners can't find the QR code.
Printing
Size matters. The QR code should be at least 3cm x 3cm — anything smaller becomes hard to scan, especially in low light. For table cards, 5cm x 5cm is ideal.
Material matters more. A paper printout taped to the table will look tatty within a week. Invest in one of these:
- Acrylic table stands — clean, professional, easy to wipe down. These are the most common choice for sit-down restaurants.
- Laminated table cards — cheaper than acrylic, still durable, can be wiped clean. Good for cafes and casual dining.
- Adhesive stickers — work well on counters, takeaway windows, and smooth surfaces. Choose waterproof vinyl stickers if they'll be outdoors.
- Printed on existing materials — add the QR code to your takeaway bags, napkin holders, or printed receipt holders. Every touchpoint is an opportunity.
Placement
On every table. If you have table service, each table needs a visible QR code. Don't make diners search for it.
At the counter. For cafes and takeaway-focused venues, place a QR code at the ordering counter and on the window or door.
Near the entrance. A QR code near the front door lets diners who are deciding whether to eat at your venue browse the menu before they sit down. This is particularly valuable for passing foot traffic and international tourists.
Include a brief instruction. Not everyone is comfortable with QR codes. A simple line like "Scan for menu" or "Point your camera here for our full menu" helps. Include a small icon of a phone camera if there's room.
Step 6: Test Everything
Before you launch, test your QR codes thoroughly.
Scan from multiple devices. Use at least two different phones — ideally one iPhone and one Android device. QR codes work differently on older phones, so if you have access to an older device, test with that too.
Check load time. The menu should load within two to three seconds on a standard mobile connection. If it takes longer, diners will give up. Most modern menu platforms are fast by default, but if you've uploaded very large images, that could slow things down.
Test different languages. If your platform supports multiple languages, switch between them and confirm the translations display correctly. Try the language your most common non-English-speaking customers would use.
Test in real conditions. Scan the QR code from your actual tables, in your actual lighting. A QR code that works perfectly under bright office lights might struggle in a dimly lit restaurant. If your venue is dark, consider a QR code with a white background border to improve contrast.
Test the allergen filters. Select a common allergen and confirm the filtering works — dishes containing that allergen should be clearly marked or hidden depending on your platform's approach.
Staff Briefing
Your team needs to know the QR menus exist and how they work. This doesn't need to be a formal training session — a five-minute briefing at the start of service is enough.
Cover three things:
How to help a diner who can't scan. Some diners will be unfamiliar with QR codes. Staff should be able to say "Just point your phone camera at the code and tap the link that appears." If a diner still can't scan, have a fallback — either a printed menu or a staff member who can pull up the menu on a tablet and show them.
What the menu looks like on a phone. Every staff member should scan the QR code themselves at least once. They need to know what diners see — the layout, the allergen filters, the language options. If a diner asks "Can I see gluten-free options?", staff should be able to say "Yes, just tap the allergen filter at the top."
When the menu gets updated. Staff should know that the digital menu is always current. If a dish runs out mid-service, ideally someone updates the digital menu in real time. At minimum, staff should know not to send diners to the QR menu if it's out of date.
What to Do After Launch
Going live is just the start. The real value of a digital QR menu comes from what you do with it over time.
Update your menu regularly. This is the whole point of going digital. Seasonal changes, price adjustments, new dishes, sold-out items — update them as they happen, not in quarterly batches. A digital menu that's always accurate builds trust. A digital menu that shows last season's specials undermines it.
Check your analytics. Most platforms provide basic scan data — how many scans per day, what time of day is busiest, which languages are requested. Use this to make practical decisions. If 15% of your scans are in Mandarin, that's a signal to add Chinese translations and possibly a Mandarin-speaking host during peak hours.
Add translations over time. You don't need to launch with multiple languages. Start in English, watch your analytics for a few weeks, then add translations for the languages your diners actually request. This is more effective than guessing which languages you'll need.
Add dish photos selectively. After a few weeks, add photos to your top five or ten dishes — the ones diners ask about most, or the ones that need visual explanation. High-quality photos of your hero dishes can improve ordering confidence, especially for diners who aren't familiar with your cuisine.
Gather feedback. Ask your regulars what they think of the QR menu. You'll hear useful things — the text is too small, the categories are confusing, a particular dish description doesn't match what arrives. This feedback is gold for improving the diner experience.
Ready to Set Up Your QR Menu?
The entire process — from entering your first dish to placing QR codes on your tables — takes less than an afternoon for a small restaurant or cafe. There's no contract to sign, no hardware to install, and no technical knowledge required.
MenuLingo's Starter plan at $19.99/month includes up to 40 menu items, one menu, and three languages — enough for most small restaurants to get started. You can upgrade to more items, menus, and languages as your needs grow.
View pricing plans to find the right fit, or start your free 14-day trial and build your first QR menu today.
Ready to make your menu multilingual?
Join restaurants already serving diners in 9 languages with accurate allergen information. 14-day free trial, no credit card required.
Start Your Free Trial